Unified Service Desk 2.1.0 download available for Microsoft Dynamics CRM 2013 / 15 / 16

You can download Unified Service Desk 2.1.0.556 Version Package Deployer and Executables from the below links,

Name Size Download Link Description
CRM2016-USD-2.1.0-PackageDeployer.exe 210.6 MB Click here USD Package Deployer to install solution components in CRM
CRM2016-USD-2.1.0-amd64.exe 88.4 MB Click here 64 bit USD client
CRM2016-USD-2.1.0-i386.exe 88.4 MB Click here 32 bit USD Client

Unified Service Desk 2.0.2 download available for Microsoft Dynamics CRM 2013 / 15 / 16

You can download Unified Service Desk 2.0.2 Version Package Deployer and Executables from the below links,

Name Size Download Link Description
CRM2016-USD-2.0.2-PackageDeployer.exe 76.5 MB Click here USD Package Deployer to install solution components in CRM
CRM2016-USD-2.0.2-amd64.exe 85.1 MB Click here 64 bit USD client
CRM2016-USD-2.0.2-i386.exe 85.1 MB Click here 32 bit USD Client

How to Search Inactive records using Quick Find View?

Using CRM OOB, we can search Only Active records for CRM Entities, other than Case Entity.

Please follow the below steps to Search, both Active and Inactive records of Contact,

Step 1: Goto Microsoft Dynamics CRM -> Settings -> Customizations and click on Customize the System.

Customize the System

Step 2: Under Entities,

  1. Expand Contact Entity.
  2. Click on Views under Contact.
  3. Double click on Quick Find Active Contacts.
  4. Click on Edit Filter Criteria.

Step 2 - Edit Filter Criteria

5. By Default, Status Equals Active which means CRM System will search only Active Contact Records.

Now Click on Clear to search both Active and Inactive Contact records.

Step 2 - 5.Clear Filter Criteria

6. Now Click on OK.

Step 2 - 6. Cleared Filter Criteria

7. Click on Save and Close in Quick Find View.

Step 2 - 7. Save and Close Quick Find View

Step 3: Click on Contact Entity and Publish.

Step 3 - Publish Contact Entity

Step 4: Once Contact Entity Customizations Published,

Goto Microsoft Dynamics CRM -> Sales -> Contacts.

Search for the Inactive record in Contact Homepage grid.

Step 4 - Contacts Home Page Grid

Step 5: After Searching, can see the required Inactive record in the Configured Quick Find View.

Step 5 - Inactive Contact record

Thank you for reading this article.

Please leave your valuable feedback.

How to Configure and Search Using Quick Find View in MS CRM?

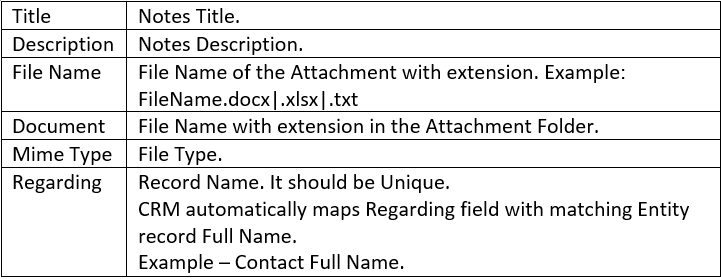
You might get this requirement quite often to search records based on some field data.

Will see an example to understand much better.

Created a field named Twitter in Contact. Now the requirement is to search Contact based on Twitter data.

Follow the below steps to configure OOB Quick Find View,

Step 1: Goto Microsoft Dynamics CRM -> Settings -> Customizations and click on Customize the System.

Customize the System

Step 2: Under Entities,

  1. Expand Contact Entity.
  2. Click on Views under Contact.
  3. Double click on Quick Find Active Contacts.
  4. Click on Add Find Columns, to Configure Twitter Search in Contact.

Step 2 - Quick Find View

5. Scroll down till you find Twitter Field and Select it. Click on OK.Add Find Columns

6. Now will add Twitter field Column in Quick Find View. Click on Add View Columns.
Show - Add View Column

7. Scroll down till you find the Twitter field and Select it and Click on OK.

Add View Columns

8. Now can see Twitter Column in Quick Find View. Then Save and Close.

Twitter Column

Step 3: Click on Contact Entity and Publish.

Step 3 - Publish Contact Entity

Step 4: Once Contact Entity Customizations Published,

Go to Microsoft Dynamics CRM -> Sales -> Contacts.

Search for the Twitter in Homepage grid.

Step 4 - Contacts Home Page Grid

Step 5: After Searching, can see the required record in the Configured Quick Find View.

Step 6 - Search Twitter field

Thank you for reading this article.

Please leave your valuable feedback.


Integrate Dynamics CRM and OneNote in CRM 2015 & 2016 Online

Follow the below steps to Integrate CRM and OneNote Online,

If you have sample CRM Online 2015 / 2016 30-day trial version, continue with the below steps.

Otherwise, Click here to know the steps to create 30 days free CRM 2016 Trial.

Step 1: For OneNote Integration with CRM Online, first step is to integrate CRM with SharePoint Online. Click here to follow my previous post on “How to Integrate Dynamics CRM and SharePoint Online

Step 2: Once CRM and SharePoint integrated Successfully, we can see OneNote icon under Microsoft Dynamics CRM -> Settings -> Document Management.

Step 3: Follow the below steps to start integration between OneNote and CRM Online,

  1. Click on OneNote Integration Icon.
  2. Select required Entities, you wish to see OneNote feature in each entity like SharePoint Documents. In this example, I selected Account & Contact.
  3. Click on Finish.

OneNote Integration Icon

Step 4: Open any existing Contact Record to see OneNote feature under Social Pane. Click on OneNote. A sample OneNote is created automatically with name Untitled. Click on it.

OneNote in Contact

Step 5: OneNote will open in a separate window. Enter the required Info and close it.Sample OneNote

Successfully integrated CRM and OneNote Online.

Thank you for reading this article.

Please leave your valuable comments on this article.

Unified Service Desk 2016 download available for CRM 2013 / 15 / 16

You can download Unified Service Desk 2016 Package Deployer and Executable Clients file from the below,

Name Size Download Link Description
CRM2016-8.0-USD-PackageDeployer.exe 76.5 MB Click here USD Package Deployer to install solution components in CRM
CRM2016-USD-amd64.exe 84.9 MB Click here 64 bit USD client
CRM2016-USD-i386.exe 84.9 MB Click here 32 bit USD Client

User does not have privilege to act on behalf another user

Got the below issue when trying to create a custom entity record with custom Security role,

Error:
User does not have privilege to act on behalf another user

Act on Behalf another user

Resolution:

Given Privilege, Act on Behalf of Another User Under Business Management in custom security role.

Resolution Act on behalf another user

Microsoft Dynamics CRM 2015 SDK & UII Download Links

Download Microsoft Dynamics CRM 2015 SDK & UII from the below links,

Name Size Download Link Description
MicrosoftDynamicsCRM2015SDK.exe 83.6 MB Click Here Microsoft Dynamics CRM 2015 Software Development Kit (SDK)
MicrosoftDynamicsCRM2015UII.exe 56.6 MB Click Here User Interface Integration (UII) solution framework, which includes a deployment guide, development guide and api reference for Unified Service Desk.

Import Notes with Attachments using Data Import in CRM

Follow the below steps to Import Notes with Attachments for a Sample Contact Record,

Step 1: Created one Sample Contact record with fullname “Arun Potti”.

Step 2: Used the below Notes Template “Note.csv”,

Note-Csv Template

Notes Template Syntax

Click here
to download Notes Template.

Step 3: Create one folder with Name “Attachments” and place all files to Import.

Attachments Folder

Step 4: Zip below files,

  1. Attachments Folder
  2. csv

Attachments - Zip Folder

Click here to download Attachments.zip.

Step 5: Import Attachments.zip using Data Import.

Attachments Output