

Javascript


How to retrieve multiple records using FetchXML in Dynamics 365 Online V 9.X using JavaScript WebAPI?
In my previous article, I have explained about How to retrieve multiple records using Odata Query in Dynamics 365 Online V 9.X using JavaScript WebAPI?
And now i will use the same example, which i used in my earlier article mentioned in the above link and retrieve multiple Account records using FetchXML query.
Multi Option Set / Picklist in CRM 2011 / 13 / 15 using Javascript

Yes it is my 50th Article in WordPress. Hope you all like my articles.
Please provide your valuable comments on my articles to improve further.
Happy New Year to all my blog viewers.
Task: Create a Multi Option Set in contact, for the OptionSet below

Solution: Follow the below steps to select multi Option Set / Picklist values in CRM,
Step 1: Create below fields in Contact form,


Step 2: Place the 2 fields on the required place on contact form, and uncheck Visible by default for “Sport Option Set Values” field.

Step 3: Create Javascript Webresource “new_multiPickList”. Open Text Editor, Copy & Paste the below Code
// Method to convert an optionset to multi select OptionSet
function ConvertToMultiSelect(var_sc_optionset, var_sc_optionsetvalue) {
var optionSetObj = Xrm.Page.getAttribute(var_sc_optionset);
if (optionSetObj != null) {
var options = optionSetObj.getOptions();
if (options != null) {
document.getElementById(var_sc_optionset).style.display = “none”;
// Create a DIV container
var addDiv = document.createElement(“div”);
addDiv.id = var_sc_optionsetvalue + “_m”;
addDiv.style.width = “100%”;
addDiv.style.height = “80px”;
addDiv.style.background = “#ffffff”;
addDiv.style.color = “white”;
addDiv.style.overflow = “auto”;
addDiv.style.border = “1px #6699cc solid”;
document.getElementById(var_sc_optionset).parentNode.appendChild(addDiv);
// Declaration of variables will be used in the loop depending upon the browser
var initialValue = 0,
maxValue = 0,
nAgt = navigator.userAgent;
if (nAgt.indexOf(“Firefox”) != -1) { // If the broswer is “Firefox”
initialValue = 1;
maxValue = options.length;
}
else if (nAgt.indexOf(“Chrome”) != -1 || nAgt.indexOf(“IE”) != -1) { // If the browser is Chrome or IE
initialValue = 0;
maxValue = options.length – 1;
}
else if (nAgt.indexOf(“Safari”) != -1) { // If the browser is “Safari”
initialValue = 1;
maxValue = options.length;
}
// Initialize checkbox controls
for (var i = initialValue; i < maxValue; i++) {
var pOption = options[i];
if (!IsChecked(pOption.value, var_sc_optionsetvalue)) {
var addInput = document.createElement(“input”);
addInput.type = “checkbox”;
addInput.style.border = “none”;
addInput.style.width = “25px”;
addInput.style.align = “left”;
addInput.style.color = “#000000”;
addInput.onclick = function() {
OnSave(var_sc_optionset, var_sc_optionsetvalue);
createTable(var_sc_optionsetvalue);
}
} else {
var addInput = document.createElement(“input”);
addInput.type = “checkbox”;
addInput.checked = true;
addInput.setAttribute(“checked”, true);
addInput.checked = “checked”;
addInput.defaultChecked = true;
addInput.style.border = “none”;
addInput.style.width = “25px”;
addInput.style.align = “left”;
addInput.style.color = “#000000”;
addInput.onclick = function() {
OnSave(var_sc_optionset, var_sc_optionsetvalue);
createTable(var_sc_optionsetvalue);
}
}
//Create Label
var addLabel = document.createElement(“label”);
addLabel.style.color = “#000000”;
addLabel.innerHTML = pOption.text;
var addBr = document.createElement(“br”); // it’s a ‘br’ flag
document.getElementById(var_sc_optionset).nextSibling.appendChild(addInput);
document.getElementById(var_sc_optionset).nextSibling.appendChild(addLabel);
document.getElementById(var_sc_optionset).nextSibling.appendChild(addBr);
}
}
}
}
// Check if it is selected function IsChecked(pText, optionSetValue) {
var selectedValue = Xrm.Page.getAttribute(optionSetValue).getValue();
if (selectedValue != “” && selectedValue != null) {
var OSVT = selectedValue.split(“,”);
for (var i = 0; i < OSVT.length; i++) {
if (OSVT[i] == pText)
return true;
}
}
return false;
}
// var_sc_optionsetvalue >> Provide logical-name for field which will
// store the multi selected values for Option Set
// optionSet>> Provide logical-name of Option Set field
function OnSave(optionSet, var_sc_optionsetvalue) {
var OS = document.getElementById(optionSet),
options = Xrm.Page.getAttribute(optionSet).getOptions(),
getInput = OS.nextSibling.getElementsByTagName(“input”),
result = “”,
result1 = “”;
var nAgt = navigator.userAgent;
for (var i = 0; i < getInput.length; i++) {
if (getInput[i].checked) {
result += getInput[i].nextSibling.innerHTML + “,”;
if (nAgt.indexOf(“Firefox”) != -1) { //If the broswer is “Firefox”
result1 += options[i + 1].value + “,”;
}
else if (nAgt.indexOf(“Chrome”) != -1 || nAgt.indexOf(“IE”) != -1) { //If the browser is Chrome or IE
result1 += options[i].value + “,”;
}
else if (nAgt.indexOf(“Safari”) != -1) { //If the browser is “Safari”
result1 += options[i + 1].value + “,”;
}
}
}
//save value
Xrm.Page.getAttribute(var_sc_optionsetvalue).setValue(result1);
}
// var_sc_optionsetvalue >> Provide logical-name for field which will
// store the multi selected values for Option Set
function createTable(var_sc_optionsetvalue) { // Get OptionSet value
var OptionValue = Xrm.Page.getAttribute(var_sc_optionsetvalue),
c_OptionValue = Xrm.Page.getControl(var_sc_optionsetvalue),
d_OptionValue = var_sc_optionsetvalue + “_d”;
if (OptionValue.getValue() != null) {
var OptionValueHtml = “<div style=\”overflow-y:auto;width:100%;display: none; min-height: 5em; max-height: 1000px;\”>”,
OptionValueHtml += “<table style=’width:100%;height: 100%;’>”,
OptionValueV = OptionValue.getValue(),
OptionValueT = OptionValueV.split(“,”),
cols = 0;
for (var row = 0; row < OptionValueT.length – 1; row++) {
OptionValueHtml += “<tr style=’height:20px;’>”;
for (var i = cols; i < cols + 3; i++) {
OptionValueHtml += “<td style=’width:33%;’>”;
if (OptionValueT[i] != null || OptionValueT[i] != undefined) {
OptionValueHtml += OptionValueT[i];
}
OptionValueHtml += “</td>”;
}
cols = cols + 3;
OptionValueHtml += “</tr>”;
if (cols >= OptionValueT.length) {
break;
}
}
OptionValueHtml += “</table>”;
OptionValueHtml += “</div>”;
document.getElementById(d_OptionValue).innerHTML = OptionValueHtml;
}
}
Step 4: Open Contact Form -> Form Properties.
Add the webresource “new_multiPickList” on Contact Form.
Select Library “new_multiPickList” and provide the function name “ConvertToMultiSelect” on “OnLoad” Event.
Provide the parameters “new_favouritesport“, “new_sportoptionsetsvalues“.

Step 5: Select Library “new_multiPickList” and provide the function name “OnSave” on OnSave Event.
Provide the parameters “new_favouritesport“, “new_sportoptionsetsvalues“.

Step 6: Save & Publish Contact Form. Open any CRM record to see the below Output,
Sources:
http://slalomdotcom.wordpress.com/2011/05/23/multi-select-option-sets-in-dynamics-crm/
http://mscrmmindfire.wordpress.com/2014/01/30/crm-2013-multi-pick-list-2/
Jsbeautifier Online JavaScript / HTML Formatter
When we are working with CRM, we often work on JavaScript or HTML.
For this we generally use Visual Studio for formatting. But, we have So many Online editors / formatters available.
In Online editors, I feel comfortable working with http://jsbeautifier.org/ (Open Source)
Want to give a try, check website.
Please comment on this article.
Hope you like it 🙂
HTML Webresource example in CRM 2011/13/15
Follow the simple example to create HTML webresource in CRM form.
Task: Create a HTML webresource, to show list of Security Roles associated to User in User (systemuser) record
Solution: Follow the below steps,
Step 1: Should include Jquery webresource in the HTML Page. Download the latest CRM SDK &Goto the below path,
SDK\SampleCode\JS\RESTEndpoint\JQueryRESTDataOperations\JQueryRESTDataOperations\Scripts

Step 2: Browse for jquery_1.9.1.min and Create “new_ jquery_1.9.1.min” Jscript Webresource as shown below,

Step 3: Create HTML Webresource “new_userRolesHTML”,

Step 4: Click on Text Editor, Copy & Paste the below code, or Click here to get HTML code
<html>
 <head>
 <title>User Security Roles</title>
 </head>
 <body>
 <script src="ClientGlobalContext.js.aspx" type="text/javascript"></script>
 <script src="../WebResources/new_jquery_1.9.1.min" type="text/javascript"></script>
 <script type="text/javascript">
 function getLoggedInUserRoles() {
 var context = GetGlobalContext();
 var userRecordId = parent.Xrm.Page.data.entity.getId();
 retrieveMultiple("SystemUserSet", "?$select=systemuserroles_association/Name&$expand=systemuserroles_association&$filter=SystemUserId eq (guid'" + userRecordId + "')", getSecurityRoleNames, null, null);
 }
function retrieveMultiple(odataSetName, filter, successCallback, errorCallback, _executionObj) {
 var context = GetGlobalContext();
 var serverUrl = context.getServerUrl();
 var ODATA_ENDPOINT = "/XRMServices/2011/OrganizationData.svc";
 //odataSetName is required,
 if (!odataSetName) {
 alert("odataSetName is required.");
 return;
 }
//Build the URI
 var odataUri = serverUrl + ODATA_ENDPOINT + "/" + odataSetName;
//If a filter is supplied, append it to the OData URI
 if (filter) {
 odataUri += filter;
 }
//Asynchronous AJAX function to Retrieve CRM records using OData
 $.ajax({
 type: "GET",
 async: true,
 contentType: "application/json; charset=utf-8",
 datatype: "json",
 url: odataUri,
 beforeSend: function (XMLHttpRequest) {
 //Specifying this header ensures that the results will be returned as JSON.
 XMLHttpRequest.setRequestHeader("Accept", "application/json");
 },
 success: function (data, textStatus, XmlHttpRequest) {
 if (successCallback) {
 if (data && data.d && data.d.results) {
 successCallback(data.d.results, textStatus, XmlHttpRequest);
 } else if (data && data.d) {
 successCallback(data.d, textStatus, XmlHttpRequest);
 } else {
 successCallback(data, textStatus, XmlHttpRequest);
 }
 }
 },
 error: function (XmlHttpRequest, textStatus, errorThrown) {
 if (errorCallback)
 errorCallback(XmlHttpRequest, textStatus, errorThrown);
 else
 errorHandler(XmlHttpRequest, textStatus, errorThrown);
 }
 });
 }
 function errorHandler(xmlHttpRequest, textStatus, errorThrow) {
 alert("Error : " + textStatus + ": " + xmlHttpRequest.statusText);
 }

 function getSecurityRoleNames(data, textStatus, XmlHttpRequest) {
 var totalCount = data[0].systemuserroles_association.results.length;
 var userString = null;
 if (totalCount > 0) {
 userString = "";
 for (var i = 0; i < totalCount; i++)
 userString = userString + data[0].systemuserroles_association.results[i].Name + "\n";
 document.getElementById("userRoles").innerText = userString;
 } else
 alert("No role associated with the user");
 }
 </script>
 <style>
 h5 {
 font-family: Segoe UI,Tahoma,Arial;
 font-weight: bold;
 font-variant: normal;
 color: #000080;
 text-decoration: underline;
 }
 p {
 font-family: Segoe UI,Tahoma,Arial;
 font-size: 13px;
 }
 </style>
 <table>
 <tr><td><h5>Security Roles</h5></td></tr>
 <tr><td><p id="userRoles"></p></td></tr>
 <tr><td> </td></tr><tr>
 <td><button onclick="getLoggedInUserRoles()">Click here</button></td></tr>
 </table>
 </body>
 </html>
Step 5: Save and Publish “new_userRolesHTML” Webresource.
Step 6: Goto Microsoft Dynamics CRM –> Settings –> Customization –> Customize the System.
Step 7: Under Entities –> User –> Forms, open Information form as highlighted below,

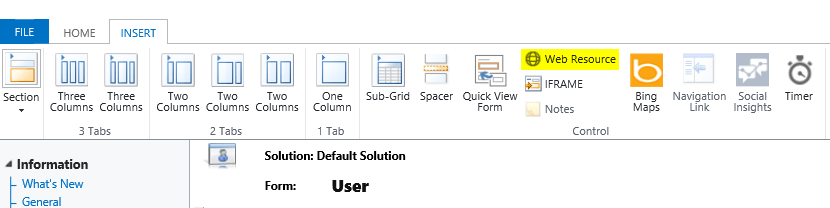
Step 8: Click on Web Resource, under Insert tab on User Information form,
Step 9: Select the HTML webresource created in Step 3, and provide the name & Label as shown below,

Step 10: Click on Ok. Save & Publish the Form.
Step 11: Open any User record, and click on Click Here button to see the User Roles.

Happy Coding 🙂
Please share your feedback.