
MB2-704: Microsoft Dynamics CRM Application
MB2-706: Microsoft Dynamics CRM Online Deployment
MB2-707: Microsoft Dynamics CRM Customization and Configuration
MB2-708: Microsoft Dynamics CRM Installation
MB2-709: Microsoft Dynamics Marketing
Will demonstrate integration between CRM and Share Point in Online 30 days Trial Version.
Please follow the below steps,
Step 1: If you have existing CRM Trial 2013 or 2015 Online, then open Office 365 Login and provide your credentials.
If not, create 30 days CRM Trial version. Click Here to create.
Step 2: Now will extend CRM Trial with Office 365 Enterprise E3 Trial, for Sharepoint with same Office account.
Click on PURCHASE SERVICES

Step 3: You can see List of Enterprise plans, check for Office 365 Enterprise E3 and click on Trial.
Click on Learn more to see the benefits that offered with Office 365 Enterprise E3.

Step 4: Click on try now for 30 day subscription.

Step 5: Once Subscription is placed successfully, you can see the below order receipt. Click on continue.
Step 6: Will take some time to reflect all the benefits offered with Office 365 E3 Subscription.
Once it is activated, you can see the below in Office 365 Login.
Click on SharePoint.

Step 7: You can see SharePoint admin center page, with list of URLs. Copy the first link as highlighted in the below screen.
Ex: https://provideyourorgname.sharepoint.com

Step 8: We are done with SharePoint. Goto Office 365 admin center and click on CRM under Admin Tab.

Step 9: Click on OPEN.

Step 10: Goto Microsoft Dynamics CRM –> Settings –> Document Management.

Step 11: Click on Enable Server-Based SharePoint Integration.

Step 12: Click on Next

Step 13: Select Online and Click on Next.

Step 14: Provide SharePoint URL and Click Next.

Step 15: Once the SharePoint URL is valid. You can see the Validation Status as Complete. Click on Enable.

Step 16: We have Succesfully Completed Server-Based SharePoint Integration.
Select Open Document Mangement Settings Wizard, and click on Finish.

Step 17: Select the required Entities that you want to store Documents, and provide SharePoint URL. Click Next.

Step 18: If the site URL is valid then you can see the below status. Select Based on entity to create folder structure based on each entity in SharePoint.
Click on Next.

Step 19: Click on OK to create Document Libraries in SharePoint.

Step 20: Document Libraries created in SharePoint. Click on Finish to complete Integration process between SharePoint and CRM Online.

Step 21: Goto Account entity and open any existing account record to test SharePoint connectivity.
Goto Associated Entity Documents.

Step 22: One you click on Documents, you can see the below message for the first time, stating that it will create a folder under Account à ArunPotti (account record) in SharePoint.
Click to Confirm.

Step 23: Once Folder created successfully in SharePoint, you can see the below SharePoint Documents Grid.
Click on UPLOAD to upload any document.

Click on OPEN SHAREPOINT, to see the documents associated to Account (Arun Potti account record) in SharePoint.
Uploaded a Sample Record that we can see here.

Step 24: Click on Site Contents to see the folders structure for each and every entity.

Hope you have successfully Integrated Microsoft Dynamics CRM and SharePoint online.
Thank you for reading this article :):):)
Please provide your valuable comments.
It is not mandatory to have the same CRM Organization Name (On-Premises) with same Database Name in Sql Server.
So to check which Oragnization pointing to the database can be known by using the below query
SELECT DatabaseName [DATABASE NAME],
FriendlyName [ORGANIZATION NAME],
SqlServerName [SQL SERVER NAME],
SrsUrl [SSRS URL],
[ORGANIZATION STATUS] =
CASE
WHEN STATE=1 THEN 'ENABLED'
WHEN STATE=0 THEN 'DISABLED'
END
FROM
[MSCRM_CONFIG].[DBO].[ORGANIZATION]
Please share your valuable feedback on this article.
When you open Online CRM for first time in a browser, we will see the below CRM Navigation/ Quick Tour Popup. If you click on Don’t show me this again also, this popup may appear again in a browser, if your browser cookies deleted.

If you want to hide Navigation/ Quick Tour permanently, there is a setting available.
Goto Settings –> Administration –> System Settings
Under General Tab, Find Set whether users see navigation tour option.
Select No for the option Display navigation tour to users when they sign in and click on OK.

Close browser and open CRM to check this.
Please provide your valuable comments on this article.
Will import CRM Organization using Existing SQL Server CRM Database backup file. Follow the below steps,
Step 1: Open SQL Server Management Studio. I am using SQL Server 2012 Enterprise Edition.
Step 2: Provide Server name, Authentication, User name and Password. Click on Connect.

Step 3: Take Backup of the Required Organization before do this Operation. Click here to know how to take backup of MSCRM Organization database backup.
Step 4: Right Click on Databases and click on Restore Database.

Step 5: Follow the below points,

Step 6: Provide Destination Database Name that you would like to give for New CRM Organization and click ok.

Step 7: Once the database is restored, you can see the below Message and Click on OK.

Step 8: Open CRM Deployment Manager and Click on Import Organization….

Step 9: You can see the below SQL Server and Organization database name automatically. Click Next.

Step 10: Provide Display Name for the New CRM Organization. Automatically Unique Database Name will populate and Click on Next.

Step 11: Report Server URL will auto populate or Provide required URL. Click on Next.

Step 12: Select Automatically Map Users, and click on Next.

Step 13: You will see the list of Active Directory Users. Click on Next.

Step 14: Click on Next.

Step 15: Click on Import.

Step 16: Update Organization is in Progress.

Step 17: Organization imported Succesfully. Click on Finish.

Step 18: Goto CRM Deployment Manager and browse for the Organization that you created.
Please provide your valuable comments on this article.

Yes it is my 50th Article in WordPress. Hope you all like my articles.
Please provide your valuable comments on my articles to improve further.
Happy New Year to all my blog viewers.
Task: Create a Multi Option Set in contact, for the OptionSet below

Solution: Follow the below steps to select multi Option Set / Picklist values in CRM,
Step 1: Create below fields in Contact form,


Step 2: Place the 2 fields on the required place on contact form, and uncheck Visible by default for “Sport Option Set Values” field.

Step 3: Create Javascript Webresource “new_multiPickList”. Open Text Editor, Copy & Paste the below Code
// Method to convert an optionset to multi select OptionSet
function ConvertToMultiSelect(var_sc_optionset, var_sc_optionsetvalue) {
var optionSetObj = Xrm.Page.getAttribute(var_sc_optionset);
if (optionSetObj != null) {
var options = optionSetObj.getOptions();
if (options != null) {
document.getElementById(var_sc_optionset).style.display = “none”;
// Create a DIV container
var addDiv = document.createElement(“div”);
addDiv.id = var_sc_optionsetvalue + “_m”;
addDiv.style.width = “100%”;
addDiv.style.height = “80px”;
addDiv.style.background = “#ffffff”;
addDiv.style.color = “white”;
addDiv.style.overflow = “auto”;
addDiv.style.border = “1px #6699cc solid”;
document.getElementById(var_sc_optionset).parentNode.appendChild(addDiv);
// Declaration of variables will be used in the loop depending upon the browser
var initialValue = 0,
maxValue = 0,
nAgt = navigator.userAgent;
if (nAgt.indexOf(“Firefox”) != -1) { // If the broswer is “Firefox”
initialValue = 1;
maxValue = options.length;
}
else if (nAgt.indexOf(“Chrome”) != -1 || nAgt.indexOf(“IE”) != -1) { // If the browser is Chrome or IE
initialValue = 0;
maxValue = options.length – 1;
}
else if (nAgt.indexOf(“Safari”) != -1) { // If the browser is “Safari”
initialValue = 1;
maxValue = options.length;
}
// Initialize checkbox controls
for (var i = initialValue; i < maxValue; i++) {
var pOption = options[i];
if (!IsChecked(pOption.value, var_sc_optionsetvalue)) {
var addInput = document.createElement(“input”);
addInput.type = “checkbox”;
addInput.style.border = “none”;
addInput.style.width = “25px”;
addInput.style.align = “left”;
addInput.style.color = “#000000”;
addInput.onclick = function() {
OnSave(var_sc_optionset, var_sc_optionsetvalue);
createTable(var_sc_optionsetvalue);
}
} else {
var addInput = document.createElement(“input”);
addInput.type = “checkbox”;
addInput.checked = true;
addInput.setAttribute(“checked”, true);
addInput.checked = “checked”;
addInput.defaultChecked = true;
addInput.style.border = “none”;
addInput.style.width = “25px”;
addInput.style.align = “left”;
addInput.style.color = “#000000”;
addInput.onclick = function() {
OnSave(var_sc_optionset, var_sc_optionsetvalue);
createTable(var_sc_optionsetvalue);
}
}
//Create Label
var addLabel = document.createElement(“label”);
addLabel.style.color = “#000000”;
addLabel.innerHTML = pOption.text;
var addBr = document.createElement(“br”); // it’s a ‘br’ flag
document.getElementById(var_sc_optionset).nextSibling.appendChild(addInput);
document.getElementById(var_sc_optionset).nextSibling.appendChild(addLabel);
document.getElementById(var_sc_optionset).nextSibling.appendChild(addBr);
}
}
}
}
// Check if it is selected function IsChecked(pText, optionSetValue) {
var selectedValue = Xrm.Page.getAttribute(optionSetValue).getValue();
if (selectedValue != “” && selectedValue != null) {
var OSVT = selectedValue.split(“,”);
for (var i = 0; i < OSVT.length; i++) {
if (OSVT[i] == pText)
return true;
}
}
return false;
}
// var_sc_optionsetvalue >> Provide logical-name for field which will
// store the multi selected values for Option Set
// optionSet>> Provide logical-name of Option Set field
function OnSave(optionSet, var_sc_optionsetvalue) {
var OS = document.getElementById(optionSet),
options = Xrm.Page.getAttribute(optionSet).getOptions(),
getInput = OS.nextSibling.getElementsByTagName(“input”),
result = “”,
result1 = “”;
var nAgt = navigator.userAgent;
for (var i = 0; i < getInput.length; i++) {
if (getInput[i].checked) {
result += getInput[i].nextSibling.innerHTML + “,”;
if (nAgt.indexOf(“Firefox”) != -1) { //If the broswer is “Firefox”
result1 += options[i + 1].value + “,”;
}
else if (nAgt.indexOf(“Chrome”) != -1 || nAgt.indexOf(“IE”) != -1) { //If the browser is Chrome or IE
result1 += options[i].value + “,”;
}
else if (nAgt.indexOf(“Safari”) != -1) { //If the browser is “Safari”
result1 += options[i + 1].value + “,”;
}
}
}
//save value
Xrm.Page.getAttribute(var_sc_optionsetvalue).setValue(result1);
}
// var_sc_optionsetvalue >> Provide logical-name for field which will
// store the multi selected values for Option Set
function createTable(var_sc_optionsetvalue) { // Get OptionSet value
var OptionValue = Xrm.Page.getAttribute(var_sc_optionsetvalue),
c_OptionValue = Xrm.Page.getControl(var_sc_optionsetvalue),
d_OptionValue = var_sc_optionsetvalue + “_d”;
if (OptionValue.getValue() != null) {
var OptionValueHtml = “<div style=\”overflow-y:auto;width:100%;display: none; min-height: 5em; max-height: 1000px;\”>”,
OptionValueHtml += “<table style=’width:100%;height: 100%;’>”,
OptionValueV = OptionValue.getValue(),
OptionValueT = OptionValueV.split(“,”),
cols = 0;
for (var row = 0; row < OptionValueT.length – 1; row++) {
OptionValueHtml += “<tr style=’height:20px;’>”;
for (var i = cols; i < cols + 3; i++) {
OptionValueHtml += “<td style=’width:33%;’>”;
if (OptionValueT[i] != null || OptionValueT[i] != undefined) {
OptionValueHtml += OptionValueT[i];
}
OptionValueHtml += “</td>”;
}
cols = cols + 3;
OptionValueHtml += “</tr>”;
if (cols >= OptionValueT.length) {
break;
}
}
OptionValueHtml += “</table>”;
OptionValueHtml += “</div>”;
document.getElementById(d_OptionValue).innerHTML = OptionValueHtml;
}
}
Step 4: Open Contact Form -> Form Properties.
Add the webresource “new_multiPickList” on Contact Form.
Select Library “new_multiPickList” and provide the function name “ConvertToMultiSelect” on “OnLoad” Event.
Provide the parameters “new_favouritesport“, “new_sportoptionsetsvalues“.

Step 5: Select Library “new_multiPickList” and provide the function name “OnSave” on OnSave Event.
Provide the parameters “new_favouritesport“, “new_sportoptionsetsvalues“.

Step 6: Save & Publish Contact Form. Open any CRM record to see the below Output,
Sources:
http://slalomdotcom.wordpress.com/2011/05/23/multi-select-option-sets-in-dynamics-crm/
http://mscrmmindfire.wordpress.com/2014/01/30/crm-2013-multi-pick-list-2/
Follow the below steps to create a simple Email record in Console application,
Step 1: Open Visual Studio and Create Console Application Project.
Step 2: First we have to establish connection to CRM. Please follow my earlier post Connect to CRM Online or On-premise using C# SDK.
Step 3: Generate Early bound class using Crmsvcutil.exe. Please follow my earlier post Generate Early bound Class using CrmSvcUtil.Exe in CRM.
Step 4: Add EarlyBound.cs to the project.
Step 5: Include the namespace using EarlyBound.cs.
Step 6: Below method will create Email record,
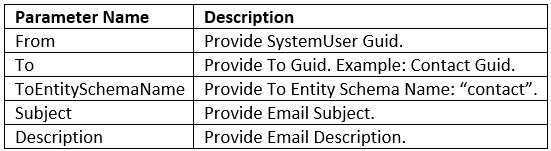
public static void SendEmail(Guid From, Guid To, string ToEntitySchemaName, string Subject, string Description)
{
try
{
// Create 'From' activity party for the email

ActivityParty fromParty = new ActivityParty
{
PartyId = new EntityReference(SystemUser.EntityLogicalName, From)
};

// Create 'To' activity party for the email

ActivityParty toParty = new ActivityParty
{
PartyId = new EntityReference(ToEntitySchemaName, To)
};

// Create an e-mail message

Email email = new Email
{
To = new ActivityParty[] { toParty },
From = new ActivityParty[] { fromParty },
Subject = Subject,
Description = Description,
DirectionCode = true
};

Guid _emailId = _service.Create(email);

SendEmailRequest sendEmailreq = new SendEmailRequest
{
EmailId = _emailId,
TrackingToken = "",
IssueSend = true
};

SendEmailResponse sendEmailresp = (SendEmailResponse)_service.Execute(sendEmailreq);

if (sendEmailresp != null)
{
Console.WriteLine("Email record created successfully");
Console.ReadKey();
}
}
catch(Exception ex)
{
Console.Write("Error " + ex.Message);
Console.ReadKey();
}
}
Step 7: Final Code will be like below,
using Microsoft.Crm.Sdk.Messages;
using Microsoft.Xrm.Sdk;
using Microsoft.Xrm.Sdk.Client;
using System;
using System.Collections.Generic;
using System.Linq;
using System.ServiceModel.Description;
using System.Text;
using System.Threading.Tasks;
using EarlyBound;

namespace LinqToCRM
{
class Program
{
static IOrganizationService _service;
static void Main(string[] args)
{
ConnectToMSCRM("arunpotti@XYZOrg.onmicrosoft.com", "password", "https://XYZOrg.api.crm5.dynamics.com/XRMServices/2011/Organization.svc");

Guid userid = ((WhoAmIResponse)_service.Execute(new WhoAmIRequest())).UserId;

if (userid == Guid.Empty) return;

Contact c = new Contact() //Create Contact Record
{
FirstName = "Arvind Kumar",
LastName = "Shah",
MobilePhone = "9876543210",
EMailAddress1 = "arvindshah@crm2015trial.com"
};

Guid contactGuid = _service.Create(c);

if (contactGuid != Guid.Empty)
{
SendEmail(userid, contactGuid, "contact", "Test Subject", "Test Description");
}
}

public static void ConnectToMSCRM(string UserName, string Password, string SoapOrgServiceUri)
{
try
{
ClientCredentials credentials = new ClientCredentials();
credentials.UserName.UserName = UserName;
credentials.UserName.Password = Password;
Uri serviceUri = new Uri(SoapOrgServiceUri);
OrganizationServiceProxy proxy = new OrganizationServiceProxy(serviceUri, null, credentials, null);
proxy.EnableProxyTypes();
_service = (IOrganizationService)proxy;
}
catch (Exception ex)
{
Console.WriteLine("Error while connecting to CRM " + ex.Message);
Console.ReadKey();
}
}

public static void SendEmail(Guid From, Guid To, string ToEntitySchemaName, string Subject, string Description)
{
try
{
// Create 'From' activity party for the email

ActivityParty fromParty = new ActivityParty
{
PartyId = new EntityReference(SystemUser.EntityLogicalName, From)
};

// Create 'To' activity party for the email

ActivityParty toParty = new ActivityParty
{
PartyId = new EntityReference(ToEntitySchemaName, To)
};

// Create an e-mail message

Email email = new Email
{
To = new ActivityParty[] { toParty },
From = new ActivityParty[] { fromParty },
Subject = Subject,
Description = Description,
DirectionCode = true
};

Guid _emailId = _service.Create(email);

SendEmailRequest sendEmailreq = new SendEmailRequest
{
EmailId = _emailId,
TrackingToken = "",
IssueSend = true
};

SendEmailResponse sendEmailresp = (SendEmailResponse)_service.Execute(sendEmailreq);

if (sendEmailresp != null)
{
Console.WriteLine("Email record created successfully");
Console.ReadKey();
}
}

catch(Exception ex)
{
Console.Write("Error " + ex.Message);
Console.ReadKey();
}
}
}
}
Step 8: Execute the project for the below output, Open CRM and check for the email record

Please provide your valuable comments on this article.
Task: Delete Contact record where Full Name = “Arun Potti”
Solution: Follow the below steps,
Step 1: Open Visual Studio and Create Console Application Project.
Step 2: First we have to establish connection to CRM. Please follow my earlier post Connect to CRM Online or On-premise using C# SDK.
Step 3: Generate Early bound class using Crmsvcutil.exe. Please follow my earlier post Generate Early bound Class using CrmSvcUtil.Exe in CRM.
Step 4: Add EarlyBound.cs to the project.
Step 5: Include the namespace using EarlyBound.cs.
Step 6: Below method will delete Contact record,
deleteContactRecord("Arun Potti");
public static void deleteContactRecord(string fullname)
       {
           using (var context = new ServiceContext(_service))
           {
               Contact conRecord = context.ContactSet.FirstOrDefault(c => c.FullName == fullName);
               if (conRecord != null)
               {
                   context.DeleteObject(conRecord);
                   if (context.SaveChanges().Count > 0)
                  {
                       Console.WriteLine("Record deleted Successfully");
                       Console.ReadKey();
                   }
               }
           }
       }
Step 7: Final Code will be like below,
using Microsoft.Crm.Sdk.Messages;
using Microsoft.Xrm.Sdk;
using Microsoft.Xrm.Sdk.Client;
using System;
using System.Collections.Generic;
using System.Linq;
using System.ServiceModel.Description;
using System.Text;
using System.Threading.Tasks;
using EarlyBound;
namespace LinqToCRM
{
class Program
{
static IOrganizationService _service;
static void Main(string[] args)
{
ConnectToMSCRM("arunpotti@MyOrg.onmicrosoft.com", "Password", "https://MyOrg.api.crm5.dynamics.com/XRMServices/2011/Organization.svc");
Guid userid = ((WhoAmIResponse)_service.Execute(new WhoAmIRequest())).UserId;
if (userid == Guid.Empty) return;
deleteContactRecord("Arun Potti");
}
public static void ConnectToMSCRM(string UserName, string Password, string SoapOrgServiceUri)
{
try
{
ClientCredentials credentials = new ClientCredentials();
credentials.UserName.UserName = UserName;
credentials.UserName.Password = Password;
Uri serviceUri = new Uri(SoapOrgServiceUri);
OrganizationServiceProxy proxy = new OrganizationServiceProxy(serviceUri, null, credentials, null);
proxy.EnableProxyTypes();
_service = (IOrganizationService)proxy;
}
catch (Exception ex)
{
Console.WriteLine("Error while connecting to CRM " + ex.Message);
Console.ReadKey();
}
}
public static void deleteContactRecord(string fullName)
{
using (var context = new ServiceContext(_service))
{
Contact conRecord = context.ContactSet.FirstOrDefault(c => c.FullName == fullName);
if (conRecord != null)
{
context.DeleteObject(conRecord);
if (context.SaveChanges().Count > 0)
{
Console.WriteLine("Record deleted Successfully");
Console.ReadKey();
}
}
}
}
}
}
Step 8: Execute the project for the below output,

Please provide your valuable comments on this article.
Task: Create Contact record
Solution: Follow the below steps,
Step 1: Open Visual Studio and Create Console Application Project.
Step 2: First we have to establish connection to CRM. Please follow my earlier post Connect to CRM Online or On-premise using C# SDK.
Step 3: Generate Early bound class using Crmsvcutil.exe. Please follow my earlier post Generate Early bound Class using CrmSvcUtil.Exe in CRM.
Step 4: Add EarlyBound.cs to the project.
Step 5: Include the namespace using EarlyBound.cs.
Step 6: Below method will create Contact record,
createContactRecord("Arun", "Potti", "9876543210", "arunpotti@xyzorg.com");

public static void createContactRecord(string firstName, string lastName, string mobileNumber, string email)
{
Contact c = new Contact()
{
FirstName = firstName,
LastName =lastName,
MobilePhone = mobileNumber,
EMailAddress1 = email
};
Guid contactGuid = _service.Create(c);
if (contactGuid != Guid.Empty)
Console.WriteLine("Contact record created");
}
Step 7: Final Code will be like below,
using Microsoft.Crm.Sdk.Messages;
using Microsoft.Xrm.Sdk;
using Microsoft.Xrm.Sdk.Client;
using System;
using System.Collections.Generic;
using System.Linq;
using System.ServiceModel.Description;
using System.Text;
using System.Threading.Tasks;
using EarlyBound;

namespace LinqToCRM
{
class Program
{
static IOrganizationService _service;
static void Main(string[] args)
{
ConnectToMSCRM("arunpotti@MyOrg.onmicrosoft.com", "Password", "https://MyOrg.api.crm5.dynamics.com/XRMServices/2011/Organization.svc");
Guid userid = ((WhoAmIResponse)_service.Execute(new WhoAmIRequest())).UserId;

if (userid == Guid.Empty) return;
createContactRecord("Arun", "Potti", "9876543210", "arunpotti@xyzorg.com");
}

public static void ConnectToMSCRM(string UserName, string Password, string SoapOrgServiceUri)
{
try
{
ClientCredentials credentials = new ClientCredentials();
credentials.UserName.UserName = UserName;
credentials.UserName.Password = Password;
Uri serviceUri = new Uri(SoapOrgServiceUri);
OrganizationServiceProxy proxy = new OrganizationServiceProxy(serviceUri, null, credentials, null);
proxy.EnableProxyTypes();
_service = (IOrganizationService)proxy;
}
catch (Exception ex)
{
Console.WriteLine("Error while connecting to CRM " + ex.Message);
Console.ReadKey();
}
}

public static void createContactRecord(string firstName, string lastName, string mobileNumber, string email)
{
Contact c = new Contact()
{
FirstName = firstName,
LastName = lastName,
MobilePhone = mobileNumber,
EMailAddress1 = email
};

Guid contactGuid = _service.Create(c);
if (contactGuid != Guid.Empty)
{
Console.WriteLine("Contact record created");
Console.ReadKey();
}
}
}
}
Step 8: Execute the project for the below output,

Please provide your valuable comments on this article.
Task: Display all Contact records Full Name from Contact entity where Status = Active and Order by Full Name
Solution: Follow the below steps,
Step 1: Open Visual Studio and Create Console Application Project.
Step 2: First we have to establish connection to CRM. Please follow my earlier post Connect to CRM Online or On-premise using C# SDK.
Step 3: Generate Early bound class using Crmsvcutil.exe. Please follow my earlier post Generate Early bound Class using CrmSvcUtil.Exe in CRM.
Step 4: Add EarlyBound.cs to the project.
Step 5: Include the namespace using EarlyBound.cs.
Step 6: Below code will retrieve records from Contact entity,
public static void retrieveContactRecords()
{
using (var context = new ServiceContext(_service))
{
var getContactRecords = from conSet in context.ContactSet
where conSet.StateCode == 0   //Check for Status == Active
orderby conSet.FullName
select conSet;

if (getContactRecords != null)
{
StringBuilder fullNameString = new StringBuilder();
Console.WriteLine("Full Name\n--------------------------");
foreach (var item in getContactRecords)
{
if (item.FullName != null)
fullNameString.AppendLine(item.FullName);
}

Console.Write(fullNameString);
Console.ReadKey();
}
}
}
Step 7: Final Code will be like below,
using Microsoft.Crm.Sdk.Messages;
using Microsoft.Xrm.Sdk;
using Microsoft.Xrm.Sdk.Client;
using System;
using System.Collections.Generic;
using System.Linq;
using System.ServiceModel.Description;
using System.Text;
using System.Threading.Tasks;
using EarlyBound;

namespace LinqToCRM
{
class Program
{
static IOrganizationService _service;
static void Main(string[] args)
{
ConnectToMSCRM("arunpotti@MyOrg.onmicrosoft.com", "Password", "https://MyOrg.api.crm5.dynamics.com/XRMServices/2011/Organization.svc");
Guid userid = ((WhoAmIResponse)_service.Execute(new WhoAmIRequest())).UserId;

if (userid == Guid.Empty) return; // Check whether connection established or not

retrieveContactRecords();
}

public static void ConnectToMSCRM(string UserName, string Password, string SoapOrgServiceUri)
{
try
{
ClientCredentials credentials = new ClientCredentials();
credentials.UserName.UserName = UserName;
credentials.UserName.Password = Password;
Uri serviceUri = new Uri(SoapOrgServiceUri);
OrganizationServiceProxy proxy = new OrganizationServiceProxy(serviceUri, null, credentials, null);
proxy.EnableProxyTypes();
_service = (IOrganizationService)proxy;
}
catch (Exception ex)
{
Console.WriteLine("Error while connecting to CRM " + ex.Message);
Console.ReadKey();
}
}

public static void retrieveContactRecords()
{
using (var context = new ServiceContext(_service))
{
var getContactRecords = from conSet in context.ContactSet
where conSet.StateCode == 0   //Check for Status == Active
orderby conSet.FullName
select conSet;

if (getContactRecords != null)
{
StringBuilder fullNameString = new StringBuilder();
Console.WriteLine("Full Name\n--------------------------");
foreach (var item in getContactRecords)
{
if (item.FullName != null)
fullNameString.AppendLine(item.FullName);
}

Console.Write(fullNameString);
Console.ReadKey();
}
}
}
}
}
Step 8: Execute the project for the below output,

Please provide your valuable comments on this article.
