
Download the latest SDK 2013 and extract the file to the Desktop.
Open CRM SDK -> SDK
Or
Click on the below links to download,
Plugin Supported Messages & Entity Metadata
Download the latest SDK 2013 and extract the file to the Desktop. Open CRM SDK -> SDK
Or
Click on the below links to download, Plugin Supported Messages & Entity Metadata
What is a Plugin?
A plug-in is custom business logic (code) that you can integrate with Microsoft Dynamics CRM Online or OnPremise to modify or augment the standard behavior of the platform.
The Microsoft Dynamics CRM event processing subsystem executes plug-ins based on a message pipeline execution model. A user action in the Microsoft Dynamics CRM Web application or an SDK method call by a plug-in or other application results in a message being sent to the organization Web service. The message contains business entity information and core operation information. The message is passed through the event execution pipeline where it can be read or modified by the platform core operation and any registered plug-ins.
Note: While there are several Web services hosted by the Microsoft Dynamics CRM platform, only events triggered by the organization and OData endpoints can cause plug-ins to execute.
The following figure illustrates the overall architecture of the Microsoft Dynamics CRM platform with respect to both synchronous and asynchronous event processing.

Points to Remember:
Pipeline Stages:
Event Pipeline Stages are 4, in which we can register plugin in 3 Stages.

Images
Pre Image: A pre-image is a snapshot of the entity’s attributes before the core operation.
Availability of Pre Images for the Plugin stages,

Post Image: A post-image is a snapshot of the entity’s attribute after the core operation.
Availability of Post Images for the Plugin stages,

We can create custom reports using FetchXML, useful for both Online and OnPremise CRM.
Quickly see a simple example, to get the list of all Contacts.
Step 1: Open BIDS (Business Intelligent Development Studio)
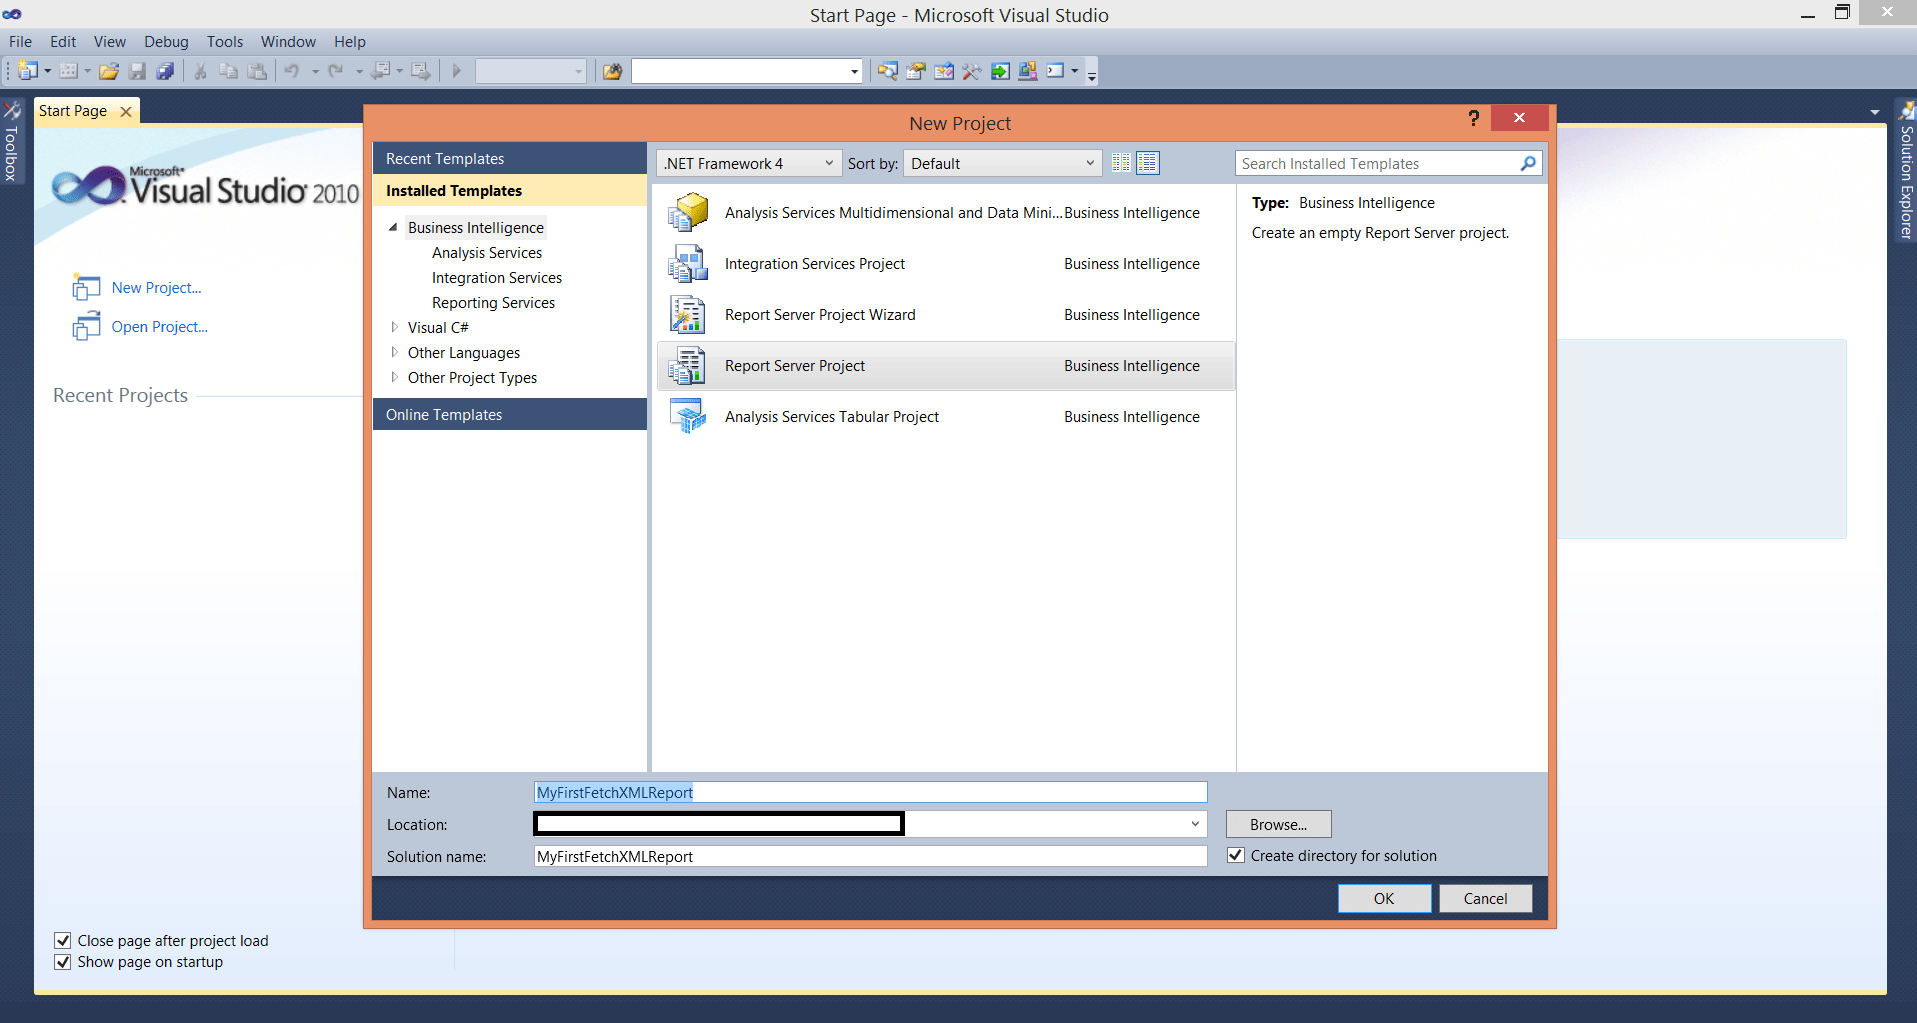
Step 2: Click New Project and select “Report Server Project”. Name your report “MyFirstFetchXMLReport”.
Step 3: In Solution Explorer, Right Click on Reports Folder and Select “Add New Report”.
Step 4: Provide the below details for the Data Source in Report Wizard.
| Name | Give Data Source name |
| Type | Select Microsoft Dynamics CRM Fetch.If you don’t find this option then search for exe “Microsoft Dynamics CRM 2013 Report Authoring Extension (with SQL Server Data Tools support)” download and install. |
| Connection String | It’s a combination of both organization URL and Name separated by semicolon.
Example: https://XYZDEMO.crm5.dynamics.com;DEMOORG For Organization Name, find the below path Microsoft Dynamics CRM –> Settings –> Customizations –> Developer Resources –> Organization Unique Name |

Step 5: Click on Credentials Button and select “Use a Specific user name and password”. Provide userid & password and Click Ok. Click Next Button.
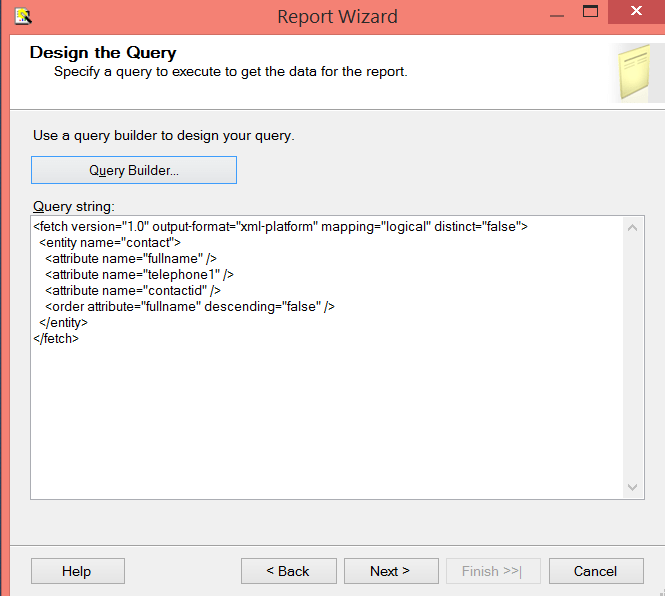
Step 6: Provide Query String which is nothing but FetchXML. Follow the below steps for getting it.
Step 7: Find the below path for opening for Advance Find.
Microsoft Dynamics CRM –> Sales –> Contacts –> Click on Advance Find button

Step 8: In Advance find, click on New Button.
Step 9: Click on Download Fetch XML button and download the FetchXML.xml File and open it with Notepad.

You can find the below query, copy and paste the below into BIDS Query String textbox
Step 10: Finally Report Wizard looks like the below, Click Next.
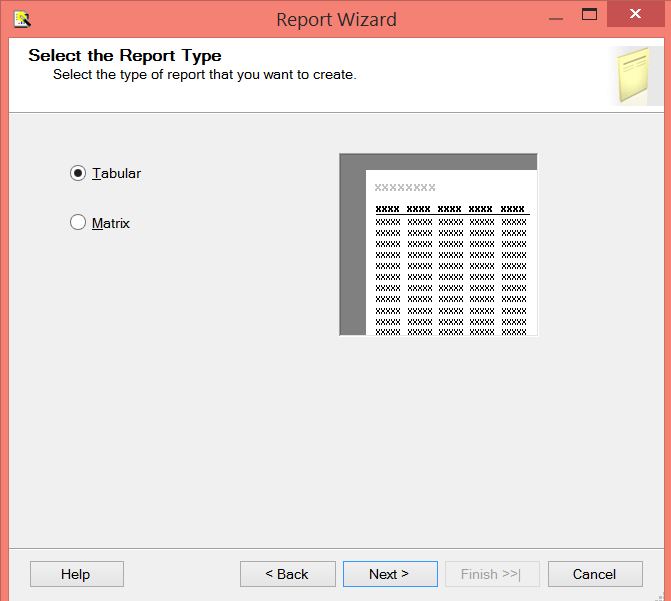
Step 11: Select Report Type “Tabular”. Click Next.
Step 12: Click Next.

Step 13: Select Table Style and Click Next.

Step 14: Give Report Name and Click Finish.

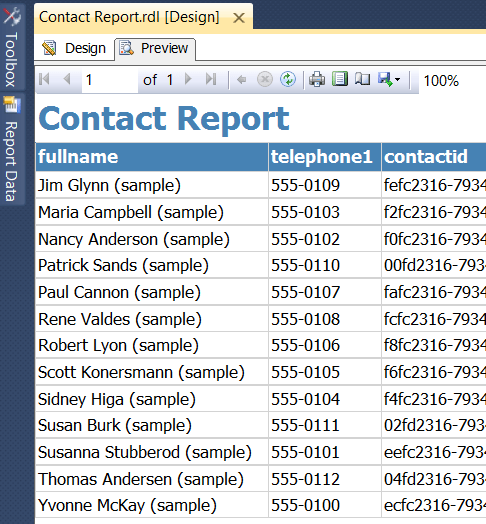
Step 15: Finally the Report design done.
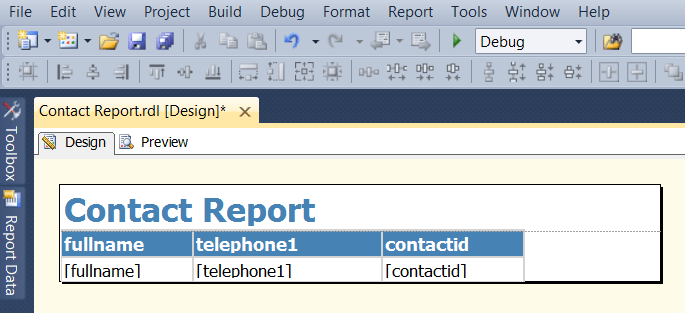
Step 16: Click on Preview.
Good Luck. Please revert for any queries.
Please provide your valuable comments on this article.
Using OData, will see an example to retrieve Security Roles of Logged In User.
Task: Retrieve Logged In User Security Roles on Onload of Contact Entity
Solution:
Step 1: Include Json2 web resource in the Contact Entity.
If you don’t have this file, download Latest SDK and go to below path and create,
\CRM SDK\SDK\SampleCode\JS\RESTEndpoint\JavaScriptRESTDataOperations\JavaScriptRESTDataOperations\Scripts
Step 2: Create new JavaScript web resource (Ex: new_contact) and include the below script,
function getLoggedInUserRoles() {
var Id = Xrm.Page.context.getUserId();
retrieveMultiple("SystemUserSet", "?$select=systemuserroles_association/Name&$expand=systemuserroles_association&$filter=SystemUserId eq (guid'" + Id + "')", getSecurityRoleNames, null, null);
}

function retrieveMultiple(odataSetName, filter, successCallback, errorCallback, _executionObj) {
var context = Xrm.Page.context;
var serverUrl = context.getServerUrl();
var ODATA_ENDPOINT = "/XRMServices/2011/OrganizationData.svc";

//odataSetName is required, i.e. "AccountSet"
if (!odataSetName) {
alert("odataSetName is required.");
return;
}

//Build the URI
var odataUri = serverUrl + ODATA_ENDPOINT + "/" + odataSetName;

 //If a filter is supplied, append it to the OData URI
if (filter) {
odataUri += filter;
}

//Asynchronous AJAX function to Retrieve CRM records using OData
$.ajax({
type: "GET",
async: true,
contentType: "application/json; charset=utf-8",
datatype: "json",
url: odataUri,
beforeSend: function(XMLHttpRequest) {
//Specifying this header ensures that the results will be returned as JSON.
XMLHttpRequest.setRequestHeader("Accept", "application/json");
},
success: function(data, textStatus, XmlHttpRequest) {
if (successCallback) {
if (data && data.d && data.d.results) {
successCallback(data.d.results, textStatus, XmlHttpRequest);
} else if (data && data.d) {
successCallback(data.d, textStatus, XmlHttpRequest);
} else {
successCallback(data, textStatus, XmlHttpRequest);
}
}
},
error: function(XmlHttpRequest, textStatus, errorThrown) {
if (errorCallback)
errorCallback(XmlHttpRequest, textStatus, errorThrown);
else
errorHandler(XmlHttpRequest, textStatus, errorThrown);
}
});
}

function errorHandler(xmlHttpRequest, textStatus, errorThrow) {
alert("Error : " + textStatus + ": " + xmlHttpRequest.statusText);
}

function getSecurityRoleNames(data, textStatus, XmlHttpRequest) {
var totalCount = data[0].systemuserroles_association.results.length;
var userString = null;
if (totalCount > 0) {
userString = "User Role : ";
for (var i = 0; i < totalCount; i++)
userString = userString + data[0].systemuserroles_association.results[i].Name + "\n";
alert(userString);
} else
alert("No Role Associated with LoggedIn User");
}
Step 3: Add new_contact Jscript web resource in the Contact Entity. Add getLoggedInUsersRoles function on Onload of Contact.

Step 4: Click on Ok. Save and Publish Contact Entity.
Step 5: Open any Contact record and see the below Popup.

Please provide your valuable comments on this article.
Especially Alert and Confirm Dialog designed for Mobiles/Tablets replacing window.alert and window.confirm.
It’s a best practice to use the new Syntax for Online/On premise as well.
Alert Dialog: Displays a dialog box like alert.
Syntax:
Xrm.Utility.alertDialog(message,onCloseCallback)
| Parameter Name | Type | Description |
| message | String | The text of the message to display in the dialog. |
| onCloseCallback | Function | A function to execute when the OK button or Close button clicked.Use null if you don’t want callback. |
Example: Set Personal Notes field with some text in Contact Entity Onload after Alert Click on Ok or Cancel/Close
Solution: Copy and paste the below Code in Contact Entity and call showAlertDialog on onLoad
function showAlertDialog() {
    Xrm.Utility.alertDialog("Click Ok or Cancel to set the Personal Notes Value", function() {
        Xrm.Page.getAttribute("description").setValue("alertDialog Fired");
    });
}
Output:
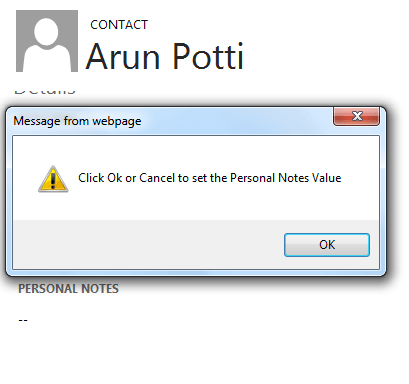
After Click on Ok or Cancel,

Confirm Dialog: Displays a confirmation dialog box that contains an optional message as well as OK and Cancel buttons.
Syntax:
Xrm.Utility.confirmDialog(message,yesCloseCallback,noCloseCallback)
| Parameter Name | Type | Description |
| message | String | The text of the message to display in the dialog. |
| yesCloseCallback | Function | A function to execute when the OK button is clicked.Use null if you don’t want callback. |
| noCloseCallback | Function | A function to execute when the Cancel button is clicked.Use null if you don’t want callback. |
Example: Set Personal Notes field with some text in Contact entity Onload after Confirm Click on Ok or Cancel/Close
Solution: Copy and paste the below Code in Contact Entity and call showConfirmDialog on onLoad
function showConfirmDialog() {
    Xrm.Utility.confirmDialog("Click Yes or No to set the Personal Notes Value",
        function() {
            Xrm.Page.getAttribute("description").setValue("Yes Callback fired");
        },
        function() {
            Xrm.Page.getAttribute("description").setValue("No Callback fired");
        });
}
Output:

Click on Ok to see the below result,

Click on Cancel or Close to see the below result,

Please provide your valuable comments on this article.
It’s a new JavaScript feature in CRM 2013.
setFormNotification
To Display Form Level Notifications we can use this method. The height of the Notification area is limited. So, every new notification will be displayed on the top. Users can scroll down for the older notifications.
Syntax:
Xrm.Page.ui.setFormNotification(message, level, uniqueId);
| Parameter Name | Type | Description |
| message | String | The text of the message |
| level | String | The level defines how the message will be displayed. ERROR : Notification will use the system error icon. WARNING : Notification will use the system warning icon. INFO : Notification will use the system info icon. |
| uniqueId | String | A unique identifier for the message used with clearFormNotification to remove the notification. |
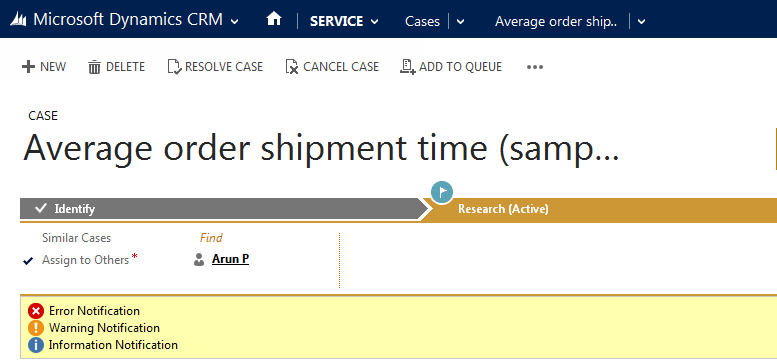
Example: Display all Form Level Notifications on OnLoad of Case entity.
Solution:Copy & Paste the below functions in a JScript Webresource and add the function callFormNotification on Onload
function callFormNotification() {
 setFormNotification("Error Notification", "ERROR", "1");
 setFormNotification("Warning Notification", "WARNING", "2");
 setFormNotification("Information Notification", "INFO", "3");
}
function setFormNotification(msg, msgType, uniqueId) {
 Xrm.Page.ui.setFormNotification(msg, msgType, uniqueId);
}
Output:
clearFormNotification
To remove Form Level Notifications we can use this method.
Syntax:
Xrm.Page.ui.clearFormNotification(uniqueId)
| Parameter Name | Type | Description |
| uniqueId | String | A unique identifier for the message used with setFormNotification to set the notification. |
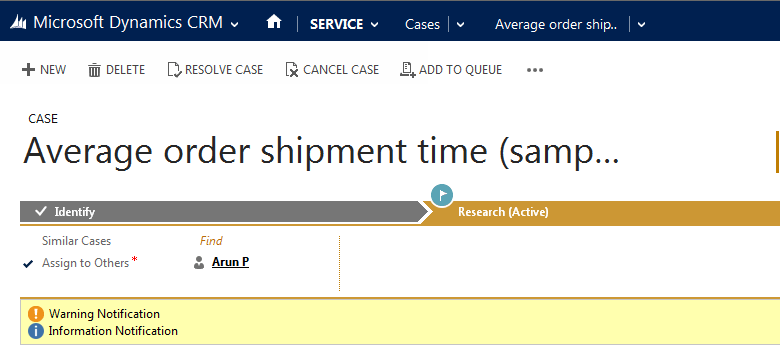
Example: Remove error Notification in the above example.
Solution: Copy & Paste the below function in a JScript Webresource and add the function removeErrorNotification on Onload
function removeErrorNotification() {
 clearFormNotification("1");
}
function clearFormNotification(uniqueId) {
 Xrm.Page.ui.clearFormNotification(uniqueId);
}
Output:
Field Level Notifications:
setNotificaion: To Set Notification at field Level.
Sytax:
Xrm.Page.getControl(fieldSchemaName).setNotification(message);
| Parameter Name | Type | Description |
| fieldSchemaName | String | Provide field Schema Name |
| message | String | Provide message to display |
clearNotification: To Remove Notificaion at field Level
Sytax:
Xrm.Page.getControl(fieldSchemaName).clearNotification();
Please provide your valuable comments on this article.
Syntax:
| Name | Type | Description |
| lookUpSchemaName | String | The lookup attribute logical name |
| entitySchemaName | String | The logical name of the entity being set. |
| recordId | String | A string representation of the GUID value for the record being set. The expected format is “{XXXXXXXX-XXXX-XXXX-XXXX-XXXXXXXXXXXX}”. |
| recordName | String | The text to be displayed in the lookup. |
function setLookupValue(lookUpSchemaName, entitySchemaName, recordId, recordName) {
    var lookUpObj = [];
    lookUpObj[0] = {};
    lookUpObj[0].id = recordId;
    lookUpObj[0].entityType = entitySchemaName;
    lookUpObj[0].name = recordName;
    if (Xrm.Page.getAttribute(lookUpSchemaName) != null)
        Xrm.Page.getAttribute(lookUpSchemaName).setValue(lookUpObj);
}
Alternate Method
function setLookupValue(lookUpSchemaName, entitySchemaName, recordId, recordName) {
    Xrm.Page.getAttribute(lookUpSchemaName).setValue([{
        entityType: entitySchemaName,
        id: recordId,
        name: recordName
    }]);
}
Please provide your valuable comments on this article.
Please follow the below code to get OptionSet Text and Value
function getOptions() {
    var obj = Xrm.Page.getAttribute("provide fieldSchemaName here");
    if (obj != null) {
        //Get OptionSet Text
        alert("OptionSet Text :" + obj.getText());
        //Get OptionSet Value
        alert("OptionSet Value : " + obj.getValue());
    }
}
Please provide your valuable comments on this article.


