
Will see a simple example, to develop and deploy plugin in CRM Online 2013 using SDK Developer Tool Kit in Visual Studio 2012.
Task: On Post Create of Account, Task should create.
Solution:
If you do not have Developer Tool Kit on your Visual Studio, Click Here to know about Installation process.
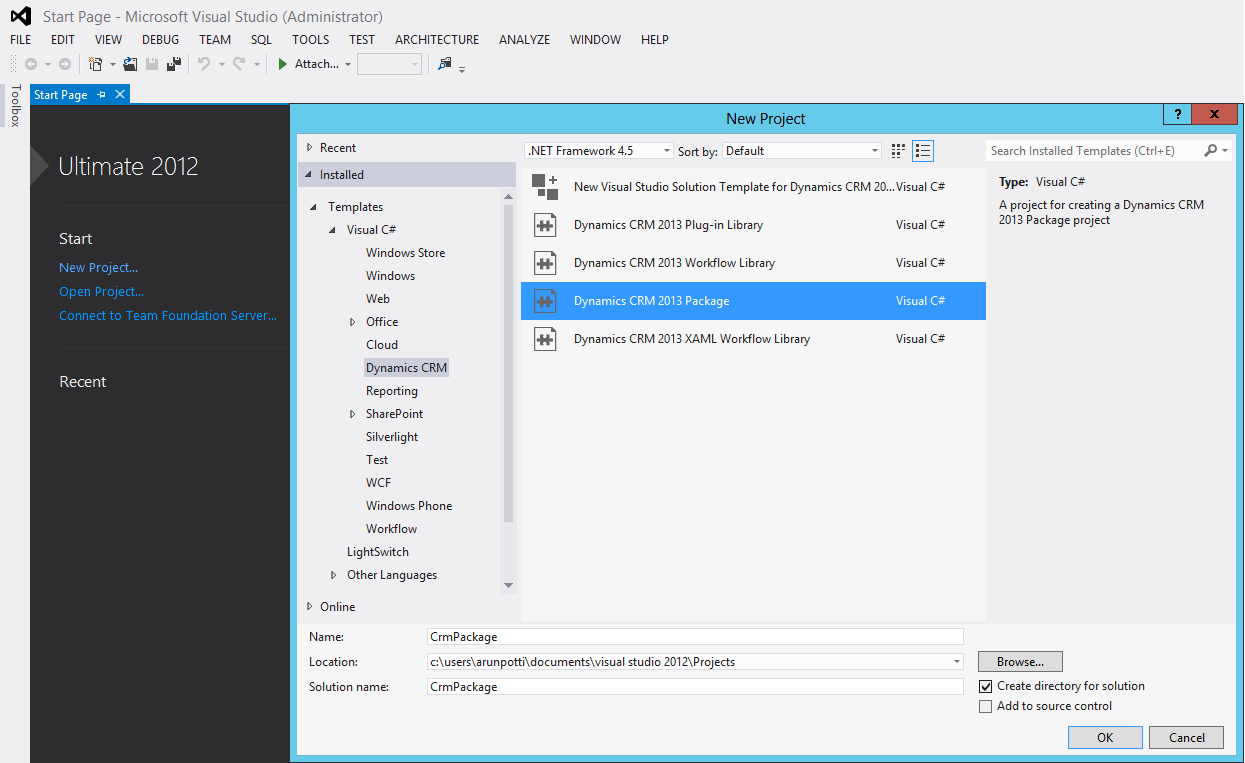
Step 1: Open Visual Studio 2012. Click on New Project. Goto Visual C# -> Dynamics CRM -> Dynamics CRM 2013 Package. Provide Name “CrmPackage”.
This package is helpful for Deploying Plugin from Visual Studio.
Step 2: Please follow the below steps,
- Provide Discovery details of your organization. (I am using CRM Online 2013)
Get this details going to CRM Web Client,
Microsoft Dynamics CRM -> Settings -> Customizations -> Developer Resources -> Discovery Service. - Select Protocol to HTTPS and click on Connect.
- Provide User name & Password and click on Log on.
- After successful login to CRM, select Organization and Solution Name. (I have Created a Separate Solution called Plugins for demo)

Step 3: Right Click on Solution ‘CrmPackage’ (1 project) and Select Dynamics CRM 2013 Plug-in Library. Provide Name as “PostAccountCreate” and click ok.

Step 4: On the Left Hand Side, we can see CRM Explorer. Goto Microsoft -> Entities -> Account -> Create Plug-in.

Step 5: Select Message, Run in Context, Pipeline Stage and Execution Mode as mentioned below. Click OK.

Step 6: You may see the below alert, click on Yes to All

Step 7: Have to provide Strong Key to the Plugin. For that Go to Solution Explorer on the right hand side, Right Click On “PostAccountCreate” and click on Properties .

Step 8: Follow the below steps for Strong Key set up.
- Go to Signing and Select Sign the assembly.
- Choose a strong name key file: to <New…>.
- Provide Key file name: as “PostAccountCreate” and uncheck the Protect my key file with a password.
- Select Signature Algorithm.

Step 9: Goto Solution Explorer, double click on “PostAccountCreate.cs” file. You can see the below code,

Step 10: Copy and paste the below code in method ExecutePostAccountCreate after //TODO: Implement your custom Plug-in business logic.
// TODO: Implement your custom Plug-in business logic.

IPluginExecutionContext context = localContext.PluginExecutionContext;
IOrganizationService service = localContext.OrganizationService;
ITracingService tracingService = localContext.TracingService;

if (context.InputParameters.Contains("Target") && context.InputParameters["Target"] is Entity)
{
Entity entity = (Entity)context.InputParameters["Target"];
if (entity.LogicalName == "account")
{
try
{
Entity followup = new Entity("task");

followup["subject"] = "Send e-mail to the new customer.";
followup["description"] = "Follow up with the customer. Check if there are any new issues that need resolution.";
followup["scheduledstart"] = DateTime.Now.AddDays(7);
followup["scheduledend"] = DateTime.Now.AddDays(7);
followup["category"] = context.PrimaryEntityName;

// Refer to the account in the task activity.
if (context.OutputParameters.Contains("id"))
{
Guid regardingobjectid = new Guid(context.OutputParameters["id"].ToString());
string regardingobjectidType = "account";

followup["regardingobjectid"] = new EntityReference(regardingobjectidType, regardingobjectid);
}

// Create the task in Microsoft Dynamics CRM.
tracingService.Trace("FollowupPlugin: Creating the task activity.");
service.Create(followup);
}
catch (FaultException ex)
{
throw new InvalidPluginExecutionException("An error occurred in the plug-in.", ex);
}
}
}
Step 11: Finally the ExecutePostAccountCreate method looks like the below,

Step 12: Save All. Click on F6 to build the solution.
Step 13: Goto Solution Explorer, and right Click on Solution ‘CrmPackage’ (2 projects). Click on Deploy Solution to deploy into Online CRM 2013.

Step 14: After Successful Deployment, you can check it, whether plugin registered on Account or not, by going to Plugin Registration Tool or Go to CRM Explorer on left hand side of visual studio, you can find the below

Step 15: Create Account record in CRM Online. After Account creation, Task is created, you can check it in under Social Pane -> Activities,

Good Luck :):):)
Discover more from Arun Potti's Power Platform blog
Subscribe to get the latest posts to your email.
Hi Arun,
Could you write an article which clearly explains all the plugin event pipeline of stages(with small example scenarios) and when they can be used. Usage of simple technical words(unlike MSDN/other blogs) would help us better understand.
Thanks
Saikrishna
Sure Sai, will post the article as early as possible.
What’s up, for all time i used to check blog posts here in the early hours in the daylight,
since i like to learn more and more.